Friday, May 29, 2015
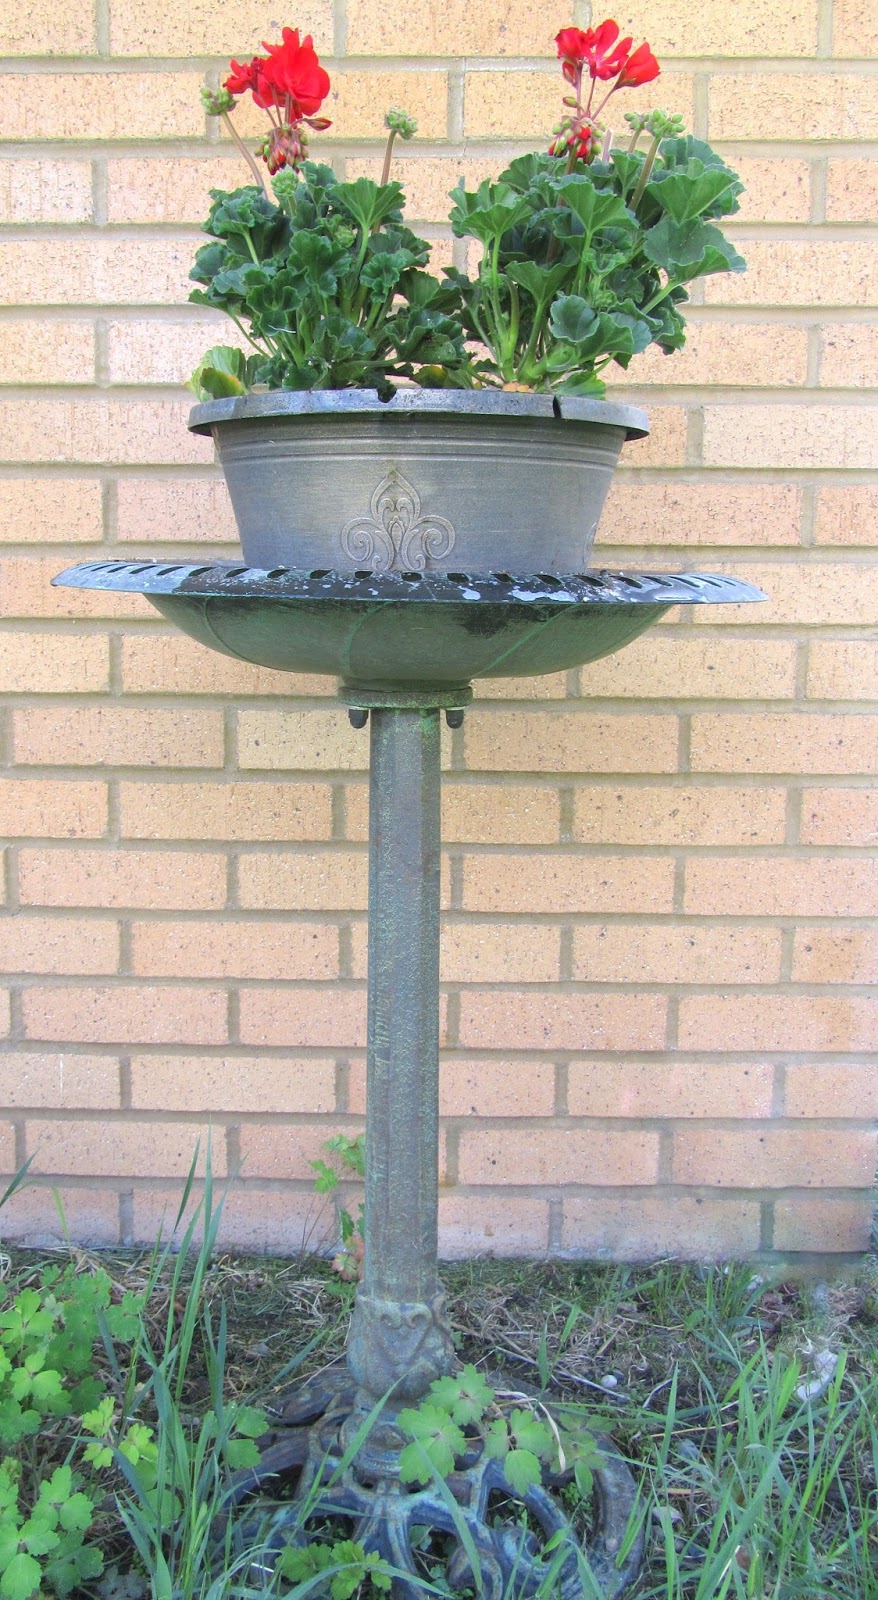
Bird Bath Plant Stand
A couple of years ago, while I was visiting in Utah, my sister gave me her old
bird bath that she didn’t want. It had a big knob in the center of it where a
metal bird had broken off. I broke the rest of it off and turned it into a
metal plant stand. I love how it has a rustic look.

Wednesday, May 27, 2015
Vigorous Hail Storm
I tried numerous times to post a blog using my usual blogging program, Windows Live Writer. After multiple tries, I got out of every program and retried again....didn't work. My next step was to shut down my computer, wait 10 minutes, turn it back on and try again....didn't work. So, with that being said, I am trying a different approach and hopefully this will work. I don't like it nearly as well as Windows Live Writer, but I'm keeping my fingers crossed that this will work.
I was just sitting in the house playing….well, not playing….attempting to play the piano with one hand, when I heard the loudest noise. It was so loud, it actually scared me for a minute until I figured out what was going on. It was a 3 – 5 minute, very vigorous, hail storm.


This put my mind in chaos….ok, do I film this or try to save my large hanging planters. Well, the planters won out, but lost. I ran for the planters to bring them to the safety of the house but I guess my running/half-way running/running-walk, to retrieve my planters wasn’t quite fast enough. They took a pretty hard beating. It severed many blooms and ripped others.


Even my little, Mother’s Day, potted plant on the porch did not escape the little hail balls.

Monday, May 25, 2015
May Christmas Tree
I just love this Christmas tree…..well, I call it a Christmas tree because to me, when the tree is in bloom, it looks like it has little miniature Christmas trees all over it. When we went to Utah in May, my (now deceased) fathers tree was in bloom. I’ve seen it in bloom many times but I have never known what kind of a tree it was and so I’ve always just called it a Christmas tree. I finally decided to look and see if I could find the name of it by looking for a picture of it on Google Images. Yes, there it was….my Horse Chestnut (Christmas Tree) Tree.


Here is an information You Tube that I found on the Horse Chestnut Tree:
https://www.youtube.com/watch?v=73bCzw5SqA4


Here is an information You Tube that I found on the Horse Chestnut Tree:
https://www.youtube.com/watch?v=73bCzw5SqA4
Friday, May 22, 2015
Capturing Spring
It was such a nice morning and most of the day was pretty nice too. While it was nice and before it started to rain, I decided to step out my door and capture Spring.


.


Thursday, May 21, 2015
Frigidaire 13.7- cu ft. Frost Free Freezer
Just a little over a year ago, we needed more freezer space so we purchased a Frigidaire 13.7 cu ft. frost free upright freezer. For the first year, it ran perfectly and then just a little over a month, after the warranty was out…….you guessed it….the freezer went out.

I actually thought we had a warranty but when I called the company, they informed me that we did not so I explained the situation and asked if it was too late to purchase the warranty. Yeah, really….they let me purchase a 3-year warranty for $80. As a rule of thumb, living out where we live, it cost more than that just to have someone come out and look at something that has broken. They said they would get in touch with me when they got in contact with someone that worked in this area. In the meantime, I was calling all over the neighborhood trying to find anyone that had freezer space that would be able to let me put our food in until ours could get fixed. I was actually able to locate one neighbor that had a freezer that was empty and it fit all of our food so I didn’t have to put our food in multiple freezers to store until ours could get fixed.
My lucky day……..the appliance repair company they had coming out to fix my freezer was “Mr. Appliance”. I have used this appliance repair company on a couple of other appliances and they are WoNdErFuL! I was hoping that they would be the company to come to our home. This was a really quick fix. All it needed was a new Freezer Electronic Control Board. He popped out the old one and put the new one in……and it only took about 5-10 minutes.

I am now back in business……..with a running freezer. However, it sure would be nice to buy a newer appliance that worked at least 10 years before breaking down. It’s only been in the past year or two that we have been replacing old appliances that had lasted 20-25 years. With the “new & improved” appliances, they sure don’t last too long before you need a repairman or a new appliance. Yep, “new & improved”, that’s what it’s all about. I would like to just find good old appliances, or anything for that matter, that isn’t totally computerized……give me back the good old days when things were built to last!
Wednesday, May 20, 2015
Graduation Cap Card – Homemade
I knew I wouldn’t be getting out of town this year to purchase any gifts for graduation, so I opted to just make some cards and place some money inside. I searched all over the net to find something that would be both appropriate for boys or girls. I came across a graduation cap, made with one piece of cardstock – BAM – Perfect! For the most part, I followed their instructions for making my graduation cards. For the tassel, I just cut a piece of cardboard from a cereal box and wound embroidery floss around it several times then tied it off with white embroidery floss. I connected the tassel to the top of the card using a red button and a self-adhesive glue dot.

When you turn the card over, it is all folded up. You fold it the same way you would do a cardboard box. You start folding in one flap, followed by each of the other flaps and tucking the last flap edge under the first flap you folded.

I found a quote by Minor Myers Jr., that I thought would go perfect with graduation. In Office Word, I made a red border, put a globe inside the border, made a watermark circle that I placed over the glove and then typed the quote on the globe. I used double-sided roller tape to adhere the saying to the inside of the cap.

I had a box of 4-3/8” x 5-3/4” envelopes already on hand so I once again used Office Word to create a template that had the student name and a graduation cap with the word congratulations curving under the hat. The envelopes were the perfect size to put the graduation cards in.

I had found the template for the graduation cap on the same site, but it wasn’t working for me so I made my own template by using the rounded rectangle shape in Office Word. I just made two different shapes of the same size and overlapped them.

These caps take but a few minutes to cut out and put together and it saved me the trouble of going to a store and trying to figure out a gift to buy for the graduates. This is something I could use every year. Ahhh, I sure like it when things come together.

Monday, May 18, 2015
5-Ingredient Meatloaf
I found this recipe for 5-Ingredient Meatloaf at Six Sisters’ Stuff. If you are ever in a pinch for time and like meatloaf, this is the recipe for you. I made it a week or two ago and it is actually really good. It comes together from start to finish in under an hour. Really, try it.

I changed my recipe up a bit by using hamburger instead of ground turkey and I used Stove Top chicken instead of turkey.

Saturday, May 16, 2015
Kindergarten Graduation Hats
Wednesday, I went to school and made graduation hats for the Kindergarten class. There are only 14 students so it didn’t take me as long to make them as it had in previous years. I always made the graduation hats when I was working at the school and since retiring two years ago, I still enjoy making hats for them. Once everything is measured and cut, the process of making them goes fairly quick…sort of.

The piece of poster board that has the peak on it is used for the hat band. Along the edge without the peak, measure up 3/4” and draw a line across the entire length. After drawing the line, make a cut from the bottom edge up to the line, about every 3/4”. You don’t need to measure these slits…they do not need to be exact. After cutting all the slits, form a ring (measure around head using a measuring tape) in the size of each childs head and staple it in the back, Fold all slit tabs inward to the center of the hat band ring.

Make circle templates of different sizes.

Take a square or diamond (depending on how you look at it) piece of poster board and trace a circle exactly in the middle. This will be used as a guide for the placement of the hat band. Write your student name in the middle of the circle…..it’s much easier to write the name before you glue the hat together.
Using a glue stick, put a layer of glue all around the inside edge of the circle. Place the hat band over the glued area and press firmly, making sure the hat band peak lines up with the peak of the square/diamond.

Just for reinforcements, put tape all around the bent slits on the inside, where they don’t show.

And, that’s it……………all done.


The Kinders were gone on a field trip Wednesday and I didn’t have a model to see how the hats would look so I looked in the Kinder cupboard and found a stuffed “something” to try the hat on.

Below is a detailed instruction sheet on how to make graduation hats.

Thursday, May 14, 2015
Nightly Thoughts
Each night I send a “Nightly Thought” out to family and friends. I send out a variety of thoughts ranging from inspiration, happy, funny, etc. Tonight as I was getting ready to e-mail a thought and when I looked at all the thoughts I had with stars by them (stars meaning…I have sent that thought out), I decided to count them just to see how many I had actually sent. When I was through counting I could hardly believe it…….I’ve sent out 1680 thoughts. I figured it had been around 3 years that I had sent out thoughts but in my wildest dreams I would never have guessed that it had been a little over 4 1/2 years. WOWZIERS!….That’s almost half a decade of thoughts.

Monday, May 11, 2015
Resteth…..Is That a Word?
This past week as I was studying and putting together my lesson to give in Relief Society, I came across a quote I was having a hard time understanding. This is the part of the quote I was having trouble with: “And this condemnation resteth upon the children of Zion.” Re-steth, re-steth, re-steth……you don’t know how many times I read this word over and over again trying to figure out what re-steth meant. I thought to myself….wow….I have never heard of the word re-steth, before. Even in Microsoft Office Word, the word resteth had the little squiggly lines underneath of it, telling me I had a misspelled word and it was not a word recognized by the Microsoft program.
Well, this goes to show you as proof, that me, being a red-head, will be the first to tell you that red roots grow deep and I was totally having a DUH moment.
It wasn’t until the next day that it dawned on me that the word was RESTETH. I was reading the word as if the “e” was a long vowel instead of a short vowel sound, when actually it was just plain old resteth (rest-eth).
Ever have one of those days?…………Too funny. It was just one of those precious DUH moments that I needed to post about.
Friday, May 8, 2015
The Book of Mormon – Keystone of our Religion & Hershey Nugget Scriptures
I am currently the 2nd counselor in Relief Society, in our ward. This week, I am in charge of giving the lesson. The lesson is titled: “The Book of Mormon – Keystone of our Religion”. This lesson contains some of the information given in a talk by Ezra Taft Benson, President of the Church, back in October of 1986. By preparing for this lesson, I have learned much, and what I already knew, was reaffirmed.
When I give a lesson, I enjoy making handouts to go along with the lesson topic. Since this lesson was about the Book of Mormon, I decided to make some Hershey Nugget scriptures. For my scripture, I added what we, as Latter-Day Saints, refer to as the Book of Mormon promise, found in Moroni 10:3-5.


These were very easy to make and for anyone who would like to make them, here is how I did it:
1. Find a scripture you would like and print it inside of a text box, measuring 2-1/4” x 1-1/16”. Make sure when you cut them out, you trim off the outer black edge.

2. For the book base, cut rectangles from cardstock, measuring 2” x 1-1/2”. For the ribbon marker, cut 1/8” ribbon pieces measuring 2-1/2” long and cut one end on a diagonal.

MY INSTRUCTIONS:
1. Put a regular piece of Scotch tape on 1/2 of the bottom of one nugget bar.

2. Turn the nugget bar over and place another nugget bar right next to the nugget bar, covering the other piece of tape.

3. Turn the nugget bars over and using scotch tape, tape a piece of ribbon to the top edge of the bars, making sure to center the ribbon where the two bars meet.

4. Using double-sided tape, place 3 strips of tape on one side of the cardstock base. (UPDATE...the double sided tape did not hold very well so I removed the Hershey bars from the cardstock and put one 1/2" glue dot in the middle then replaced the bars. The glue dots seem to hold more firmly) You don’t have to be too particular about this because it gets covered up.

5. Place the nugget bars evenly over the taped side of the cardstock.

6. Take the scripture paper and fold it in half.

7. Turn the scripture paper over and put 2 strips of double-sided tape on each end, and one smaller strip in the middle. Once again, it doesn’t need to be too exact because it too will be covered up.

9. Place and push the folded scripture in the center of the nugget bars, making sure the top part of the writing is facing towards the ribbon end.

10. Lay the scripture paper over your nugget bars and press the taped ends on the edges of the bars.

11. Put a small amount of double-sided tape towards the middle of the ribbon and tuck the ribbon between the middle of the nugget bars.

You’re done – that’s it. It seems like a long process but it actually goes fairly quick. Just think of all the possibilities you can do with these nugget books. You could make a little story book for children (just be careful giving them to younger children as the small pieces could cause a choking hazard), an appreciation gift for school teachers, a gift for your local librarian…………………………
Subscribe to:
Posts (Atom)